Brief: Many interesting server-based apps are available as a Docker Image which simplifies the deployment of a server.
Docker Engine on a Digital Ocean Droplet
- To use Docker Images, you install Docker EngineAt the time of this writing, Docker Engine is the open source community version of Docker on a compatible server.
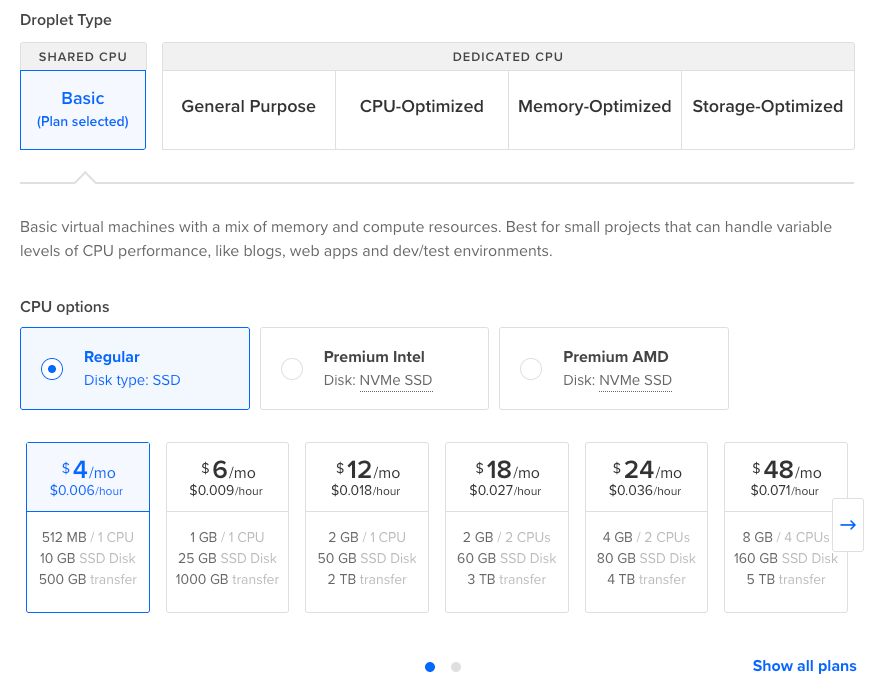
- Digital Ocean provides inexpensive virtual machines caleld Droplets for as low as $4/month. A $6/month droplet is capable of hosting modest Dockerized server applications. If server resources need to be increased, Droplets can resized up but not down.
- Droplets are initialized with Images which are templates for the installed operating system. There are many imaages listed in their Marketplace to pick from. Specifically, the Docker Image creates the droplet with a minimal Docker container host.
- After creating the Droplet, you can use Digital Ocean’s Droplet Dashboard to access the root console and issue docker commands to do application installation.
CHEAPEST DROPLET OPTION?
At the time of this writing Digital Ocean has a hidden $4.00/month. It’s just 512MB/10GB but this is adequate for simple services. It does not work with other Marketplace Images which usually have higher RAM requirements.
The new droplet will be truly bare, with no firewall activated. There is only the root user as well. Security practices are up to you. There is extensive helpful documentation the Digital Ocean’s website specific to their services.
Using Docker to Install Applications
After you have created your Droplet with Docker Engine, you can then ssh into it and use Docker from the command line.
By default, the Droplet only has a root user, so you will be issuing all your commands as root. However, the dockerized applications you install are containerized and can not access the host filesystem, so it is relatively secure. The containerized app, however, may still be susciptible to hacking.
The docker command manages all aspects of running containerized services. To “compose” an application, a compose.yaml file defines which of these services are loaded and configured. By using this file to define all the services you need for a running server application, you can easily deploy applicationsServices themselves are defined from other Docker Image files. These Images define only their networking and server resource needs, so composing your Docker application from multiple images is relatively easy. However, each server has static configuration that you’ll likely need to enter in the compose.yaml file. This is where Docker setup can get tricky for non-technical users, as many of the needs require a technical background to understand. .
Example: Installing Comentario using Docker Compose
I recently used the above approach to install a self-hosted commenting system called Comentario for use with my static website. They provide a Docker Playground compose file to play with. I used this as the basis for creating my own digital ocean file.
CREATING THE COMPOSE FILE
Their sample file defines the following services:
- db which defines the postgres database service, using the
postgres:17-alpineimage as its source - app which defines the comentario application itself, using the
registry.gitlab.com/comentario/comentarioimage as its source
Additionally, I added a https proxy service called Caddy. As this server will be public on the Internet, it needs to support https.
Here is what my modified compose.yaml file looks like. It’s stored in the root user’s home directory, which is the working directory from which I’ll run the docker command.
FILE 1: compose.yaml
services:
  db:
    image: postgres:17-alpine
    environment:
      POSTGRES_DB: comentario
      POSTGRES_USER: postgres
      POSTGRES_PASSWORD: <POSTGRES_USER_PASSWORD>
    healthcheck:
      test: ["CMD", "pg_isready", "-U", "postgres"]
      timeout: 5s
      retries: 5
      start_period: 10s

  app:
    image: registry.gitlab.com/comentario/comentario
    environment:
      BASE_URL: https://comments.dsriseah.com
      SECRETS_FILE: "/secrets.yaml"
    ports:
      - "8080:80"
    healthcheck:
      test: ["CMD", "wget", "-O", "-", "http://localhost/api/user"]
      timeout: 5s
      retries: 5
      start_period: 5s
    depends_on:
      db:
        condition: service_healthy
    volumes:
      - ./secrets.yaml:/secrets.yaml:ro

  caddy:
    image: caddy:2-alpine
    ports:
      - "80:80"
      - "443:443"
      - "443:443/udp"  # For HTTP/3
    volumes:
      - ./Caddyfile:/etc/caddy/Caddyfile:ro
      - caddy_data:/data
      - caddy_config:/config
    depends_on:
      - app
    restart: unless-stopped

volumes:
  caddy_data:
  caddy_config:
FILE 2: secrets.yaml
postgres:
  host:     db
  port:     5432
  database: comentario
  username: postgres
  password: <POSTGRES_USER_PASSWORD>
FILE 3: Caddyfile
comments.dsriseah.com {
    reverse_proxy app:80
}
These three files are used to configure and run the application using docker compose up which is our goal!!!
Notable observations and changes to Comentario’s Playground version
GENERAL
- All these files are in the working directory.
- The
volumeskeys are used to define independent volumes to persist data per service asworking_file:mount point. For example, theCaddyfileis made available to thecaddyservice at the containerized file system mount point/etc/caddy/Caddyfileas a read-online file.
POSTGRES PASSWORD
- The string
<POSTGRES_USER_PASSWORD>is the randomized string I use rather than the internal default. This is likely security theater“[…] implementing security measures that are considered to provide the feeling of improved security while doing little or nothing to achieve it.” —Wikipedia on my part.
APP SERVICE CHANGES
- The
secrets.yamlfile is rather poorly named; file is static configuration used only by ComentarioI could probably renamed it tocommentario-secrts.yamland update thevolumesmapping. It’s mounted at the root of Docker’s containerized file system, whee Comentario probably looks for it at runtime. - Aside: This file is also used to configure other things in Comentario, which you can read about here.
HTTPS AND DOMAIN
- Since I’m deploying on the internet and not in a dev container, I changed
BASE_URLto point tohttps://comments.dsriseah.com, which is the main dashboard for both the comment system administrator (me) and users. - I also had to point this subdomain to the IP address of the Droplet to resolve to that name.
Running Docker Compose and Starting the Application
Now that all the configuration is done, you can issue the following commands! Make sure you are in your working directory with all the files in the same place. Issue this command in the CLI:
The -d option runs the application detached in the background
docker compose up -d
You’ll see a bunch of stuff on the screen, and with luck everything works. In my example, the comments.dsriseah.com server is running the Comentario app and all is well.
As docker compose is a container manager, it has similar commands to utilities like systemctl for the entire set of containers! The “application” is the combination of all running containers and their persistent resources (e.g. volumes).
Here’s the basic commands I’m using. There are a lot more commands in the reference.
LIFECYCLE
docker compose up      - update and run services
docker compose down
docker compose start
docker compose restart - reload static config
MANAGEMENT
docker compose ps      - list running containers
docker compose logs
docker compose pull    - update service from image path
docker compose exec    - issue shell command to container
Application Configuration
At this point, you have a regular server application running. In the case of Comentario, I would browse to its URL and start configuring it as I would any server application through its own front end.
STATIC CONFIGURATION
Comentario’s static configuration is stored in a file called secrets.yaml which is copied to the mount point that it expects. To update this file, I have to
- edit the
secrets.yamlfile in my working directory (in this example, it’s the root user directory) - issue
docker compose restartto make Docker update it.
MAINTENAANCE
Since this installation of Comentario is based on the image: registry.gitlab.com/comentario/comentario line in compose.yaml, I can update it by issuing:
docker compose pull app
docker compose restart app
This updates the binaries just for the app service which is Comentario. The postgres database has all the persistent data and is unaffected, as are the other resources defined for caddy.