SYNOPSIS
OBS Studio is free video recording software that can overlay text, graphics, and video sources to create a composite video feed. This feed can then be encoded for livestreaming to a service like Twitch or YouTube Live. The video feed can also be used as a virtual webcam that Discord can use. This is how Sri, Rootkit, and others are combining their webcam and desktop views on the same video feed in the Discord Video Chat room.
Requirements
- A web camera (optional)
- A medium-strong computer made preferably in the last 4-5 years.
- Windows, MacOS, or Linux running an up-to-date version of your operating system.
- A copy of OBS Studio installed from https://obsproject.com/ for your operating system.
Outline of Setup
You can also read the official instructions for setting up the virtual camera on the OBS site
First we need to do some minimal configuration. OBS can handle several different kinds of streaming services and purposes, and you can create multiple profiles for each one. In our case, we just need to create a simple on for virtual web cameras since we are not using Twitch or YouTube.
Then, we need to create a collection of scenes that contain various sources such as a desktop display, an external webcamera, images, animation, text and so on. Each scene can have multiple sources at different sizes and positions, so you can switch betweeen scenes as your like. For example, you might have a scene for AWAY FROM KEYBOARD, another scene for JUST MY WEBCAM, and another that is MY DESKTOP and MY WEBCAM on top.
- Create a PROFILE and choose 'I just want to use it as a virtual camera', accept defaults. This sets up the quality and type of video stream without having to do a lot of math.
- Create a SCENE COLLECTION. This will create SCENES that contain SOURCES.
Now that we have a SCENE COLLECTION set, let's add some sources! We will make a single 'scene' with both a DISPLAY and a WEBCAM in the corner to start.
If you are familiar with using graphics software that has "layers" of "objects" you can scale and position, that's how OBS Studio works.
- Click the first scene in the LEFT COLUMN. You will see that there are no SOURCES defined in the column to the right. You can ignore the AUDIO MIXER and CONTROLS columns for now.
- Use the + button at the bottom of the SOURCES column to add a DISPLAY CAPTURE. This is used to pick the screen you want to use in your virtual webcam.
- Next, use the + button again to add a VIDEO CAPTURE DEVICE. This will look for available web cameras connected to your computerNote that if you are using other video conferencing software that controls the webcam, it may not be available to use in OBS until you quit those applications and restart OBS.
You will notice that after adding these sources, they may not be positioned in a way you can see them, or they are too big.
-
Click on the VIDEO CAPTURE DEVICE you added (the webcam) in the SOURCES list. You will see its FRAME outlined in red on the PREVIEW DISPLAY. You can use the mouse to move and resize it. You may need to right-click the source and edit its "transform", which is a set of parameters that describe how the source should be drawn inside of the frame. The easy way to do it is to just choose FIT TO SCREEN, then drag the edges of the red rectangle to size to fit. If you want to do it exactly, you can use EDIT TRANFORM, though there are quite a few numbers there to understand.
-
As you scale and move the VIDEO CAPTURE DEVICE, you can place it where you like relative to the DISPLAY CAPTURE source (your screen).
Assuming we like what we see, we can then use the CONTROLS section of OBS Studio to START VIRUTAL CAMERA.
- You won't see very much change on OBS other than the button
- Open the DISCORD APP and click your USER SETTING (the gear icon next to your name at the bottom left). Then click VOICE & VIDEO.
- There is a VIDEO SETTINGS area that allows you to preview video and select the CAMERA to use. If OBS Virtual Camera is installed correctly (and sometimes it doesn't work out of the box; see troubleshooting section), you should be able to select it and see it in the preview area.
Once you've confirmed it is working, you can now use the OBS VIRTUAL WEBCAMERA in your Discord Video Chat Rooms!
Additional Tricks
- You can blur your desktop by applying a FILTER to its source.
- You can overlay other graphics and even import web site effects. For an idea of what this could look like, check out any archived Twitch streams to see how the game screen, chat, webcams, and other special effects all work together
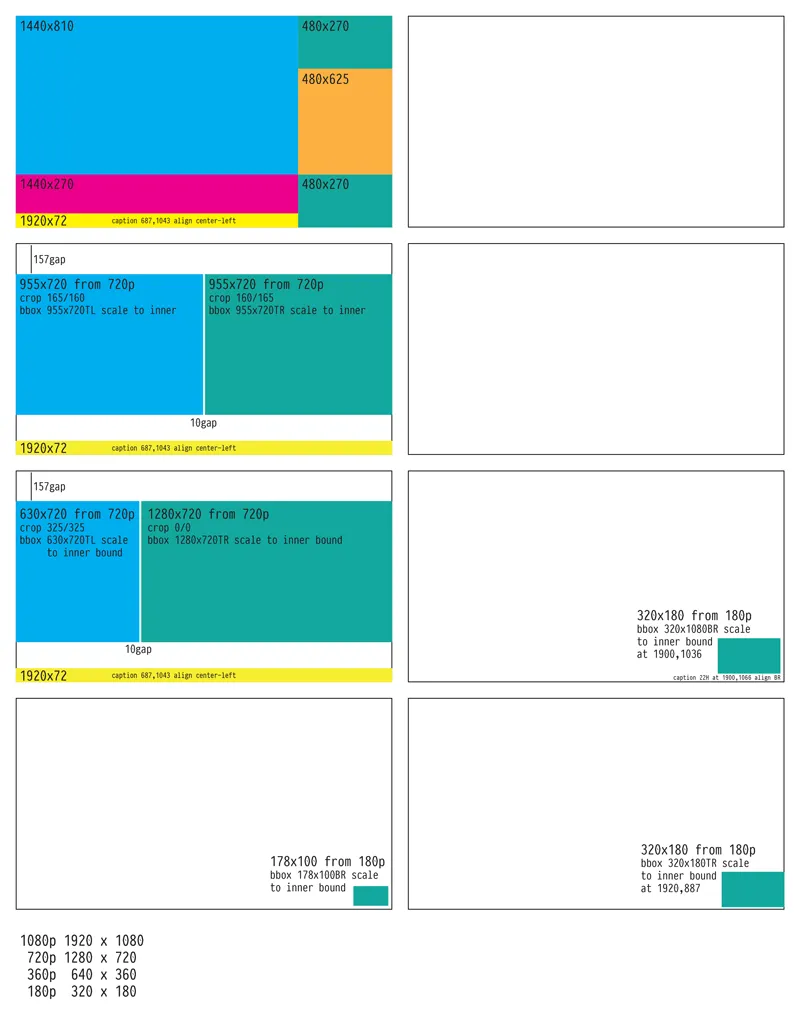
- You can tweak your layout using a planning template like mine
Troubleshooting
This guide is assuming you are using the Discord App, not the web browser version. The virtual camera may or may not work with the web app version of Discord, but it's worth a try.
- For Windows, the virtual camera should "just work". If not, this troubleshooting guide is where you would start looking (or ask someone)
- For the Macintosh in particular, the system's software protection needs to be relaxed to allow Discord to even see the Virtual Camera. See the MacOS Virtual Camera Compatibility Guide. Apple's own apps can not be made to see "virtual cameras" so Safari, Photo Booth, etc won't work with it.
- For Linux, each distro has its own pecularities with hardware support, so their wiki page is probably the best place to start.
Resources
Sri's Video Template
If you want to make an exactingly precise layout, you need to know a lot of things about the native dimensions of your various graphics sources and how to scale them just right. In general, I assume a 16:9 (HD) display ratio with a canvas resolution of 1920x1080. Not all computers or webcams have the same base desktop or device resolution, so you often have to (1) figure out what it is and (2) assuming that the docs aren't wrong, figure out the right arithmetic to move it and size it right.
I used this template to set up my screen with various graphic elements, web browser sources, and multiple video feeds which are possible when using special hardware.